 As you know, household vacuum cleaners are distinguished by the type of cleaning into two categories: ordinary and washing. The latter, as a rule, are significantly more expensive, and the wet cleaning mode is used much less often than dry. In addition, the need for painful assembly-disassembly of the washing vacuum cleaner, cleaning its internal components and the tank of dirt, a long drying process often bring a lot of trouble.
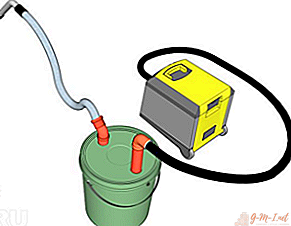
The question arises whether it is possible to build a device for an ordinary vacuum cleaner on its own, so that it acquires the functions of a detergent. It turns out that this is not only possible, but also quite simple. To do this, it is necessary to put a container in the path of air with liquid trapped by the device, in which water will sediment with contaminated particles moistened in water.
Obviously, it is very difficult to make a full-fledged model in industrial quality, which will, among other things, supply liquid to the nozzle on the treated surface. It will be about the use of devices that allow wet cleaning without any problems, including dry cleaning of furniture, using a conventional vacuum cleaner for dry cleaning.
Tools and Supplies
To do this, you need the following materials:
- three-liter glass jar with a plastic lid;
- a straight section of a sanitary pipe with a diameter of 32 mm;
- plumbing corner of the same section;
- a plastic corrugated pipe about a meter in length of a known diameter to us;
- a small segment of a bicycle chamber with holes made in it;
- bottle for liquid with a spray as a cover;
- sealant.

Of the tools, in addition to skilled hands, you will need a knife or scissors to make round holes for plumbing fittings in the lid of a three-liter jar - a dirty water tank.
Assembly order
First you need to make and assemble a tank for waste fluid.
In the plastic cover with a sharpened blade, make neat holes for the diameter of 2 plumbing parts. A corner is inserted into one formed nest, a straight pipe is placed in the second. Seal the joint with a sealant to avoid air leaks and additional power loss.
 It is necessary to prevent a situation in which the water in the can emitted from the inlet under the influence of air pressure is not reflected, would fall into the outlet of the tank, leading towards the vacuum cleaner. This can lead to serious negative consequences, including damage to the device. For this purpose, it is necessary to pull a segment of the bicycle chamber onto the branch pipe that comes through the container cover from the side of the future tip, after having previously made a number of medium-sized holes in the rubber surface - through them water will fly out to the bottom of the can, slowing down the speed of movement.
After that, the lid with nozzles is put on the jar. A corrugated fragment of a plastic pipe is inserted into the inlet of the can, where a straight section of the tube with a damper from the rubber chamber is located. A vacuum cleaner nozzle is attached to the second free end. Into an outlet located at an angle of 900From to the area of the lid, the bell of the sleeve of the vacuum cleaner is placed.
This completes the assembly.
Carry out a test operation. Select a cleaning item, such as a soft sofa that requires dry cleaning. Fill the bottle with clean water or soapy water. Apply the solution using the spray tip on the surface of the sofa.
Turn on the vacuum cleaner. Lean the tip against the area of contamination and, slightly pressing it, swipe from top to bottom several times. At this time, monitor the status of your tank - a 3-liter can. The fluid should come out of the straight pipe without falling into the corner. If the spray is still strong, reduce the size of the holes in the muffler or reduce the power of the vacuum cleaner. If the pressure is insufficient, on the contrary, it is necessary to eliminate air leaks by selecting a denser cover or wrapping insulation on the corrugated fragment for a better junction with the tip and the entrance to the container.
ATTENTION! If the device with the manufactured device works stably, from time to time during cleaning check the liquid level in the jar so that it does not drag towards the vacuum cleaner.
It is very simple to clean the container - just gently remove the lid with nozzles, drain dirty water and rinse. It is much faster and easier than servicing a vacuum cleaner designed for this after wet cleaning. To avoid loss of power, be sure to also remove and rinse the camera from time to time.
Leave Your Comment