 A modern sedentary lifestyle leads to a deterioration in physical fitness, gradually translating thoughts about a beautiful figure into a section of dreams. The situation is aggravated by the lack of time to visit sports halls, as well as, what a sin, and the desire to look into them. The Roman chair will help to rectify the situation - one of the most effective devices that will add appeal to your press. Since body fat is preferred to settle on the abdomen and sides, sports equipment will be useful to everyone, regardless of gender and age.
What is a roman chair?
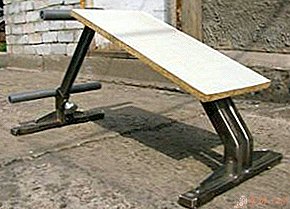
 The Roman chair is a simulator, the purpose of which is to give relief to the muscles of the abdominal cavity, lower back, outer and inner thighs, as well as the gluteal muscles. The modern version consists of a bench located on a slope and equipped with rollers that allow you to conveniently fix your legs. More expensive models make it possible to maximize the projectile for themselves by adjusting the incline of the bench, as well as pull legs to the body. Consider how to make a Roman chair with your own hands: drawings and dimensions of the structure.
Do-it-yourself roman chair
Only 2 manufacturing options:
- metal profile construction.
- wooden.
The standard version confidently withstands the weight of 90 kg, but if you weigh more, then use thicker pipes in the manufacture. Wooden models are less popular due to their bulkiness and lower reliability.
Drawings and Dimensions
The assembly of the structure is preceded by the preparation of its drawing indicating all the main dimensions. It is recommended to choose a ready-made option from the many presented on the Internet, which will save you time. The main elements of the Roman chair are:
- racks on which legs are fixed;
- central pipe;
- a board for a seat and thin foam rubber;
- soft cushions and foot rests.
The standard equipment is a simulator length of 1100 mm, a width of 500 mm and a height in the upper position of the bench of 700 mm. The distance from the floor to the roller should be about 400 mm.

How to assemble a design
Since welding is required to make a chair, you either must have the necessary skills and equipment, or seek the help of a specialist. The work is carried out in several stages:
- The pipe (preferably square) is cut into the necessary fragments, and then connected by welding. The cross section of the pipe should be at least 50x50x4 mm. Next, the foot mounts from the tube are welded.
 The board used for the seat is taken 3 cm or more, while it is recommended to treat it with an antiseptic, which will extend the life of the structure. Metal corners are screwed to it, then welded to the finished frame or bolted with bolts, the holes for which must be pre-drilled.
- After fixing, the seat is covered with thin foam and then leatherette. It should not be too soft as a result.
- Welding places are carefully processed with sandpaper, after which the entire bench is painted. Finally, soft foam rolls are fixed on the tubes that serve to hold the legs.
 The board used for the seat is taken 3 cm or more, while it is recommended to treat it with an antiseptic, which will extend the life of the structure. Metal corners are screwed to it, then welded to the finished frame or bolted with bolts, the holes for which must be pre-drilled.
A wooden Roman chair is made according to the same principle, while all elements should be carefully processed with sandpaper to absolute smoothness. You should not assume that the shell will turn out much cheaper than the purchased one, however, it is guaranteed to be stronger and more reliable, it will last you more than one year.
Leave Your Comment